The Easiest Vanilla Cake ever!

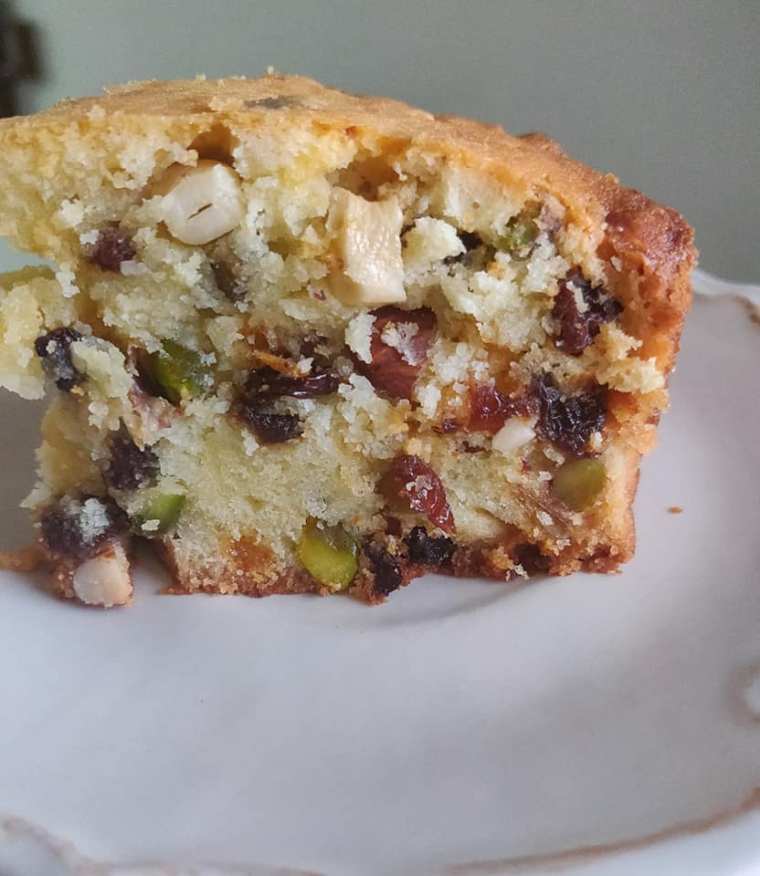
Our ‘Stud’, a buttery vanilla batter holds together a bucketful of fruit and nut. A crunchy top and a heavily studded crumb. For me, this beats any number of iced cakes hands down. This is my go to cake recipe now. Make it plain and savour the pure vanilla notes. Use vanilla beans or good quality vanilla extract to enjoy it to the full.
Add lemon or orange rind, or lots and lots of nuts like I did in this!
97035432_10158242487908563_782045074232967168_n

The Easiest Vanilla Butter Cake Ever!

200 grams each of Maida (All purpose flour), butter, powdered sugar
1 tsp Baking Powder
1 tsp vanilla extract
3 eggs

Sift flour and baking powder.
Cream sugar and butter till light and creamy ( 5 mins)
Add eggs one by one beating after each addition.
Beat in the vanilla extract.
Mix the flour in two lots.
Bake in a pre-heated oven at 180 degrees for 40-50 minutes.
To add nuts, roll them in a tbsp flour and add at the end. The batter will be thick. And it needs to be.
To bake as a basic vanilla or lemon or orange add some yogurt/milk if the batter feels too thick, about 3-4 tablespoons)

The last image is of the cake baked plain and nuts added only to the top.  Mysteriously all the cashews were swiped off the crust overnight! 🧐
(Yes I still drink from superhero mugs😁)

Mithai Muffins, the easiest cake recipe ever!

Mithai Muffins 1
Three years back, I started off as a reluctant baker. And I still am always on the look out for simple recipes. Separating eggs, beating whites till stiff peaks etc is not for me.

So, I was super excited to see this recipe on my friend Rhea’s blog. Such an easy peasy one, almost too good to be true!! And I can play with it any number of ways. And play, I did!

Here is the magical basic recipe on Euphorhea. And here is how I made these delightful Mithai Muffins. Call them Kesar Pista Cupcakes or Gulab Jamun Muffins or whatever you fancy, I kinda like Mithai Muffins. So here goes

100 grams Maida (plain flour/ All purpose flour)
100 grams powdered sugar
100 grams butter, at room temperature
1 tsp baking powder
2 eggs, at room temperature
1 tsp vanilla extract (I use Nilesen Massey, get the best one you can)
A fat pinch of good quality saffron
1/4 cup slightly warm milk
1/4 cup pistachios chopped coarse
1 tsp cardamom powder
(can add other nuts also if desired)
I had about 50 grams of mawa leftover in the fridge and I used that too. ( You may skip if you don’t have it)

Pre-heat the oven to 200C.
Rub the saffron in a mortar and pestle with 1 tbsp of warm milk so it releases the flavour and colour. Add the 1/4 cup of milk and leave it to steep.
Whisk the flour with the baking powder in a bowl.
Whisk the butter, mawa ( if using) and sugar for 3-4 mins. I just used my hand whisk.  Add the eggs and whisk a little more till smooth and slightly fluffed up. Add the cardamom powder, saffron milk and mix well.
Leave the whisk and using a spatula, mix in the flour. Add the pistachios, saving some for topping the muffins. Can add a little more milk if the batter looks too thick. I didn’t need to.
Scoop the batter into lined cupcake pans, sprinkle the tops with pistachios and bake at 180C for 15-18 mins. The tops should brown and a toothpick inserted should come out clean.
This makes 12 medium muffins.
I have a feeling I am going to use this basic recipe a lot! Thanks Rhea ❤


Mithai Muffins .jpg

Coffee Cake

Coffee Cake

I simply love coffee flavoured cakes and cannot seem to find a prominent coffee flavour in the ones available in the market. This recipe from Amrita’s  blog makes the best coffee cake ever!

Makes 12 cupcakes or two small loaf cakes
120 grams Maida/ All purpose Flour
170 grams powdered sugar
2 Eggs
80 grams butter, at room temperature
1 tsp Baking Powder
1 Tbsp Cocoa Powder
2 Tbsp Coffee Powder (Nescafe or any other)
2 Tbsp Boiling water
1 tsp Vanilla Extract
Coffee Cake 1.jpg
Mix the coffee in water and leave to cool.
Pre-heat the oven at 200C.
Whisk together the flour, cocoa powder and baking powder.
Mix butter and sugar till creamy and smooth. Add the eggs one at a time, whisking after each addition. Add vanilla extract and mix well.
Now using a spatula add the dry ingredients in three lots, mixing in till the flour mixture disappears. Add the coffee and mix in.
Pour to a prepared pan or the lined muffin pan.
Bake at 180C for 20-25 mins for cupcakes and 30-35 mins for loaf cakes.


Christmas Fruit Cake, step by step recipe

Simple Christmas Cake
My first Christmas cake ever! And what a delight it is 😀
Thanks to my dear friends Aruna , who blogs at ãhãram and Freda, who blogs at Aromatic Essence, for inspiring me with their gorgeous bakes.

Here is my simple Christmas Fruit Cake with a fair amount of fruit and a hint of spice.
A simple step-by-step recipe!

250 grams/2 levelled cups of maida/ all purpose flour + 32 grams/ ¼ cup for coating the soaked and drained fruit
250 grams/ 1 cup softened salted butter (I used Amul)
200 grams brown sugar ( I weighed and powdered it)
4 large eggs ( they should weight around 250 grams)
1 ½ tsp Baking powder
½ tsp cinnamon and ½ tsp ginger powder *
350 grams of mixed fruit soaked in 200 ml freshly squeezed orange juice**
½ tsp vanilla extract

Soaking the fruit
A day before the baking day soak mixed fruit in 200 ml orange juice. I used equal amounts of golden raisins, black currants, dried cranberry, glace cherry, candied orange peel and  candied fruit ( or tutti frutti), Add 2 tsp of rum to add a boozy hint. Two hours before baking drain the fruit well, saving the drained liquid to be used for brushing the cake later.
Add ¼ cup of maida to the drained fruit and mix so that the flour coats the fruit. This will ensure that the fruit does not sink to the bottom while baking.


Preparing the tin
Use an 8 or 9 inch round baking tin with high sides, preferably a springform pan.Line it with parchment. Alternatively use a heavy non-stick cake or bundt pan and grease it well. I used a heavy non-stick bundtlette pan and didn’t need to do any of this 😛

Baking the cake
Pre-heat the oven at 150C.
Sift together 250 grams of flour, baking powder, cinnamon and ginger powder.
In a large pan, whisk the butter. Add the powdered brown sugar and whisk till creamy. Add the eggs one by one and mix after each addition. Whisk in the vanilla.
Add the flour and mix with the spatula. It will be a thick batter.
Stir in the flour-coated fruit. Incorporate to mix evenly.
Transfer to pan and even out the batter with the spatula. Bake for  45- 60 minutes. About 35 minutes into the baking time cover the cake with aluminium foil to prevent over browning. Let cool completely in the pan and remove.
Brush with the leftover juice and serve.
To store, wrap in cling film and store in an airtight box.

* Spices may be skipped if you dislike the taste
** Can used un-soaked fruits if you forgot to soak. Toss them in flour and add. Do not use black currants if using un-soaked fruit. Use raisins, cranberry, glace cherry, candied fruit and tutti frutti

Christmas Fruit Cake.jpg

Fruit and Nut Holiday Cookies

Cookies!! A lot of them are being baked in my kitchen these days. It is December and the weather is nice and nippy and Christmas is almost here. No wonder cookies are calling!
Pistachio Cranberry Cherry Roll-out Cookies.jpg
This is my favourite shortbread cookie dough and I throw in different fruit and nuts to get a variety on the cookie platter. And trust me when I say each variation tastes different

Here is the basic dough recipe (yeah, it is the same I baked the much-loved Hyderabad Karachi style fruit cookies with!) This makes a big batch. It can be halved.
(Makes 45 thick cookies)
450 grams (about 3 ½ cups) Maida/all purpose flour
330 grams (3 cups)  butter, softened at room temperature
150 grams ( 1 ½ cup) of granulated sugar, measured out and powdered in the mixer
1 ½  cups of candied fruit/ chopped nuts/ chocolate chips. I divided the dough into 3 parts and added different things to all.
1 ½ tsp rose extract or any other like vanilla, almond or pistachio. Rose works best.
1 tsp cardamom powder

Beat the sugar and butter with a hand whisk till it is creamy. This takes 2-3 minutes by hand.
Add the rose extract and the fruit and nut mixture.
I split into three and added
-Slivered cashews and almonds to the first lot
-Pistachios, dried cherries and cranberries to the second and
-White and Strawberry chocolate chip cookies to the third
Add the flour and bring the dough together with your fingers. The dough will be crumbly.


Divide the dough into three and make logs and cling wrap them and put in the refrigerator for an hour at least. The dough can be kept in the refrigerator for two days.

Alternatively shape into discs and cling wrap. Chill for 30 minutes and then roll about ½ inch thick and cut cookies.

Preheat the oven at 175C and bake on a parchment paper lined cookie sheet for 10-12 minutes till the cookies start to change colour around the edges. Bake a little less if you want them crumbly. Cool on the cookie sheet for five minutes and then move to a wire rack to cool completely.
Once cooled completely, store the cookies in air tight containers. They stay good for up to a fortnight, if they last that long, that is!

White Chocolate and Strawberry Chip Cookies.jpg

Cashew Almond Bit Crunchy Cookies.jpg

Jim Lahey’s Chocolate Bread

Chocolate Cherry Cranberry Bread.jpg
This is a no-recipe kind of post, really, another no-knead bread! This time right in the spirit of the festive season with chocolate, cranberry, cherry and walnuts. This is my version of Jim Lahey’s Chocolate Coconut bread. We aren’t big coconut fans here, so I skipped it and threw in some fruit and nut, which we are huge fans of!
Throw in everything, proof and bake- ta daa!! Slice and chomp away 😀
Jim Laheys Chocolate bread .JPG

280 grams (2 cups+ 2Tbsp) Maida/APF
150 grams (1 cup) chocolate, chopped into chunks [Use milk or dark. I used half dark and half milk]
60 grams of cranberries and cherries (optional)
A handful of coarsely chopped walnuts (optional)
¾ tsp salt
¼ tsp instant yeast
270 grams (1cup+3 Tbsp) water, at room temperature

In a large bowl, mix all the ingredients listed with a wooden spoon or your hand, and leave covered till it is more than doubled up and had bubbles over the surface. It may take anything from 5-24 hours depending on the temperature and humidity.

Gently drop the dough on a flour dusted surface. Be careful not to tear the dough. With lightly floured hands and a plastic scraper, shape the dough into a round ball or two loaves.  Lahey bakes it in a Dutch oven (DO) but I have tried baking both in a DO as well as a loaf tin, and it comes out perfect in either.


To bake in a loaf tin:
Transfer  the shaped loaves into two greased  9×5 greased loaf tins. Cover and leave to rise till doubled. To check if the bread is proofed, gently stick a floured finger in the loaf. If the impression stays, the dough is done, else let it rise for another 15-20 minutes.
Bake in a pre-heated oven at 200 degrees for 35-40 minutes. The bottom when tapped should sound hollow.
To bake in a Dutch Oven:
Take a large  cotton or muslin napkin and  generously dust it with flour. Gently place the dough on the napkin with the seam side down. Cover and leave to rise till doubled. To check if the bread is proofed, gently stick a floured finger in the loaf. If the impression stays, the dough is done, else let it rise for another 15-20 minutes.
Chocolate Cherry Cranberry Bread5.JPG
Half an hour before the end of the second rise, place the DO in the oven on the middle rack preheat the oven to 250C for 30 minutes. Remove the DO from the oven and gently invert the dough into the pot. Cover and bake for 30 minutes. Remove the lid and lower the temperature to 230C. Bake for another 15-20 minutes.
Cool and slice.

Every time I have baked and served this bread, it has got immense love! Go try it 😀
Have a lovely December!

Love
Garima


Cashew Cherry Chocolate Chip Cookies

More cookies!! Yes 😀 Coz it’s the season to be merry! I am going to be posting a lot of cookies before I leave for a longish vacation next weekend. I plan to take boxes of them as gifts! Hence, the cookie overload.  Please bear with me.I played around with my chocolate chip cookies recipe and baked these.
Cashew Cherry Chocolate Chip Cookies.jpg
These cashew and cherry studded,bejewelled beauties make for a pretty gift. They are eggless (can be made with egg too) and super easy to put together. I haven’t tried a whole wheat version yet, but I added some oatmeal to kinda add a healthy touch. The oats did good things to the texture!
Cashew Cherry Chocolate Chip Cookies2.jpg

1 cup /130 grams plain flour/Maida
½ cup/50 grams oatmeal (grind the regular oats in a mixer-grinder)
½ cup /110 grams unsalted butter, at room temperature ( Skip salt if using salted butter like Amul)
1 cup brown sugar/200 grams, closely packed ( May use white sugar if brown is not available)
½ cup thick curd  at room temperature (or an egg)
1 tsp vanilla extract or essence
½  tsp baking soda
¼ tsp salt (skip if using salted butter)
½ cup chocolate chips (dark/milk/milk chocolate or a mixture of all three)
½ cup cashwes
½ cup glace/candied cherries, chopped into halves

In a small bowl, sift together flour, baking soda and salt.
In a large bowl, beat butter till creamy. Add the sugar and beat till soft and fluffy.
Add the yogurt (or egg, if using) and vanilla and beat till all is homogenous.
Add the flour mix to the wet ingredients and fold in gently.
Add the chocolate chips and mix till they are evenly distributed into the dough.
Cover the dough with cling film or slightly greased aluminium foil and refrigerate for an hour.
Preheat the oven to 180C and line or grease a baking tray.
Taking 1 tbsp of dough at a time (you may use an ice cream scoop) make small balls and flatten them to discs. Stick cashews and cherries on the cookies.
Lay them on the baking tray 2 inches apart.
Bake for  11-14 minutes till the chocolate melts.  Watch for the bottoms of the cookies changing colour. As soon as the bottoms just begin to brown, remove and cool on the tray for 5 minutes. Gently move them to a wire rack and let cool completely. They stay good for a week in an airtight box.


Cashew Cherry Chocolate Chip Cookies1.jpg
 

Quick and no fuss Coffee flavoured Cookies

Espresso cookies.JPG
Quick,no-fuss and coffee flavoured; what’s not to like! I sometimes bake a batch of these biscuits with our morning tea. Yeah, they are that simple, not to mention crisp and the refreshing espresso flavour. They come together in fifteen minutes (plus the baking time)

Here is what you need to get 25 gorgeous coffee cookies:
(Recipe sourced from Treat N Treat)

130 grams/1 cup Maida/All purpose flour
¼ tsp baking powder
1 tbsp instant coffee powder dissolved in 1 tbsp hot water (I used Nescafe)
85 grams/ 6 Tbsp butter, softened (I use Amul)
60 grams/ eaped ¼ cup of powdered sugar ( I weigh white granulated sugar and then powder it in the mixer-grinder)
¼ tsp vanilla extract

Preheat the oven to 160C.
Mix coffee powder in hot water and leave to cool.
Sift together flour and baking powder.
Cream butter and sugar, add coffee and vanilla extract.
Add flour and bring together to get a soft dough.
Make 25 small balls, flatten them and press down a little with a fork. Lay them an inch apart on the baking sheet.
Bake for 18-20 minutes. Cool on the baking sheet for a few minutes and then move to a wire rack to cool completely.
*To bake chocolate biscuits,omit the coffee and add a tbsp of cocoa
** To bake vanilla biscuits- Omit the coffee and increase the vanilla extract to a tsp

Enjoy!

Cheers!
Garima

Coffee Cookies

Fresh Strawberry Jammy Tea Cakes

Fresh Strawberry and vanilla Jammy Cupcakes5.jpg
Think of a soft buttery vanilla cupcake. Now think of fresh strawberry jam that cooks on top of  the little cake as it bakes! Tempted yet?
The crunchy top and moist crumb of this cake is a scrumptious contrast in textures! And the jam oozing…..mmmmmm
Fresh Strawberry and vanilla Jammy Cupcakes6.jpg
The first time I ate it, I wished  there was way more surface area on this cake to enjoy the strawberry jam flavoured crunch of the top. So the next time around, I made it as a round cake 😛


This cake celebrates the perfect marriage of strawberry and vanilla. Make it as a 9 inch cake or 12 muffins, it is delicious either ways! And it is such a simple recipe too!

You need
(Recipe adapted from Once Upon a Chef)

190 grams/ 1 ½ cup Maida/APF
1 ½ tsp baking powder
85 grams/ 6 Tbsp salted butter, softened (I use Amul)
220 grams/ 1 cup + 2 Tbsp granulated white sugar, weighed and powdered
1 large egg
1 tsp pure vanilla extract
120 ml/ ½ cup milk, at room temperature
2 Tbsp yogurt/curd
About 300 grams strawberries, hulled, washed and cut into halves ( the sweeter the strawberries, the better it is)

Grease and line a 9 inch round cake pan or a 12 cavity muffin pan. Do remember to line the bottom as well as the sides of the pan, as the jam oozes and may cause the cake to stick to the pan.
Pre-heat the oven at 170C.
Whisk together the flour and baking powder in a medium sized bowl.
Save two tablespoons of powdered sugar and beat the rest with butter till creamy and fluffy.
Add the egg and vanilla and mix well.
Add the flour alternating with milk in three lots. Whisk in the yogurt. The batter will be a thick dropping consistency.
Transfer to the muffin pan and stick one or two  strawberry halves on the top. If baking in a 9 inch cake pan, dot the entire surface closely with the halves.

Dust with sugar ( and top with some strawberry choc chips, if feeling indulgent as I did with some 😛 )


Bake for 25-30 minutes for cupcakes and 45-60 minutes for a cake. Check doneness by inserting a toothpick in the centre of the cakes/cake. It should come out clean.
Enjoy biting into the jammy yumness!


Wholewheat Multigrain Pineapple Upside Down Cake with Strawberries

Each time I saw an ‘upside-down’ cake, I was tempted to bake one, mainly because it is such a pretty cake! And when I saw this Pineapple Upside down Cake, I was smitten ❤ Have-to-bake-kind smitten. ( Will do this fully loaded version soon! )Multigrain Pineapple Upside Down Strawberry Cake.jpg
Now, since I am baking so much off late (and because my family needs dessert after dinner every Single night! ) I have made whole-wheat aata my new best friend.
I baked this Multigrain wholegrain pineapple upside down cake last night. Had no cherries, so used up the box of strawberries I had in the fridge. The cake is mildly sweet, with strawberries thrown into the batter for nice texture and flavour. I served it dusted with sugar and a drizzle of low fat cream. The boys cleaned their plates and went for seconds ( and thirds. Sigh…so much for healthy 😛 )

I baked it in a 8 ½ x 4 ½ loaf tin and took almost 40 minutes to bake. The next time around I am baking this is a 9 inch round tin. Although delicious, I felt the cake layer under the pineapples should be thinner.

Preparing the pan and the topping
Line a 9 inch round cake pan with parchment and brush spread 2 Tbsp melted butter all over the base.
Sprinkle 2 Tbsp brown sugar over the butter.
Arrange pineapple slices over the sugar and stick a strawberry (or a cherry) in the middle of each pineapple ring, Set the pan aside and prepare the batter.

The cake
4 Tbsp butter
50 grams brown sugar
50 grams white granulated sugar (powdered)
1 large egg
½ tsp vanilla or pineapple extract
1 cup plus 2 tsp multigrain flour/aata
¾ tsp baking powder
½ tsp baking soda
1/3 cup milk, at room temperature
½ cup chopped strawberries
3-4 pineapple slices ( I used canned pineapple)

Preheat the oven at 180C.
Whisk one cup of flour, baking powder and baking soda in a small bowl.
In a medium sized bowl, whisk together the sugars and butter till creamy.
Add the egg and vanilla (or pineapple) extract and incorporate them into the mixture.
Add the flour in two batches alternating it with the milk and mix, Do not over-mix.
Toss the chopped strawberries in 2 tsp of flour and gently fold them into the mixture.
Pour the batter in the prepared tin and bake for 30-35 minutes or till a toothpick inserted comes out clean.
Let cool in the pan for 15 minutes and then invert in a plate with sides, to catch the caramel drizzle on the top of the cake.
Gently peel off the parchment.
Serve warm dusted with a touch of powdered sugar and a drizzle of cream on the side


IMG_1542.JPG